Configure roles and permissions
Review the standard roles, invite with the right one, create a custom "Team lead" role, adjust its permissions, assign it and verify it.
On this page
- Before you start
- Step 1: Review the standard roles
- Step 2: Invite someone with a standard role
- Step 3: Create a custom role
- Step 4: Adjust its permissions
- Step 5: Give the role to a member
- Step 6: Verify
- Change or delete the role later
- Remove a member
- Least privilege: give each person only what they need
- Related
Every member of your company has one role. The role decides what they can see and do — in the company workspace, in the office, in meetings and in Company administration. HyoNova checks the role on the server for every action, so hiding a button is never the only protection.
In this tutorial you review the five standard roles, invite someone with a standard role, then build a custom role called Team lead: an employee who can also assign tasks to others and run meetings. You adjust its permissions, give it to a member, check that it works, and learn how to change or delete it later.
Before you start#
Only owners and admins can do everything in this tutorial. Managers can open Company administration but cannot see Roles or Permissions. Three rules always apply:
- You can't grant more than you have. You cannot give a role, or put a permission in a custom role, that you do not hold yourself. An admin cannot make someone an owner.
- You can't change your own role or remove yourself. Ask another owner or admin.
- A company always keeps at least one owner. HyoNova refuses to change or remove the last owner.
Step 1: Review the standard roles#
| Role | What it changes |
|---|---|
| Owner | Everything, including payroll, restricted finance records and billing changes. The person who creates the company is its first owner. |
| Admin | Runs the company day to day: invites and removes members, manages roles and custom roles, creates and builds offices, allows guests, company settings and the audit log. Cannot see payroll or restricted finance records, or change billing. |
| Manager | Leads work and meetings: creates and updates projects, tasks, customers, sales and files; assigns tasks to others; moderates meetings; creates guest links and manages guests. Sees the overview and read-only pages of Company administration. No finance. |
| Employee | Works on projects, tasks and files; reads people, customers and sales; chats, calls, joins and invites to meetings, shares their screen. Takes tasks for themselves but cannot assign them to others. |
| Restricted | Reads tasks and files and enters the office. No chat, calls, meetings, spatial voice or people directory. |
You can see the same roles in the product:
- Open Settings → Access. Select Settings in the sidebar and the Access tab. Your access shows your own role and permission count; Roles lists the five standard roles; Permission matrix shows what each one may do in each area.
- Open Company administration → Access → Roles. Here you see the standard roles together with your company's custom roles, with the number of permissions and members of each.
For the full comparison, see Roles and permissions.
Step 2: Invite someone with a standard role#
The invitation form offers the five standard roles only. Pick the closest one; you can give a custom role once the person has joined.
- Open the invitation form. Open People and select Invite, or use New → Invite person in the top bar.
- Fill it in. Enter the Full name and Their work email. In Role, choose the role. The list only offers roles you are allowed to grant, and Employee is chosen by default.
- Create the invitation. Select Create invitation link and share the link if the email does not arrive.
The person gets that role as soon as they accept. See Invite your first team for the full invitation steps.
Step 3: Create a custom role#
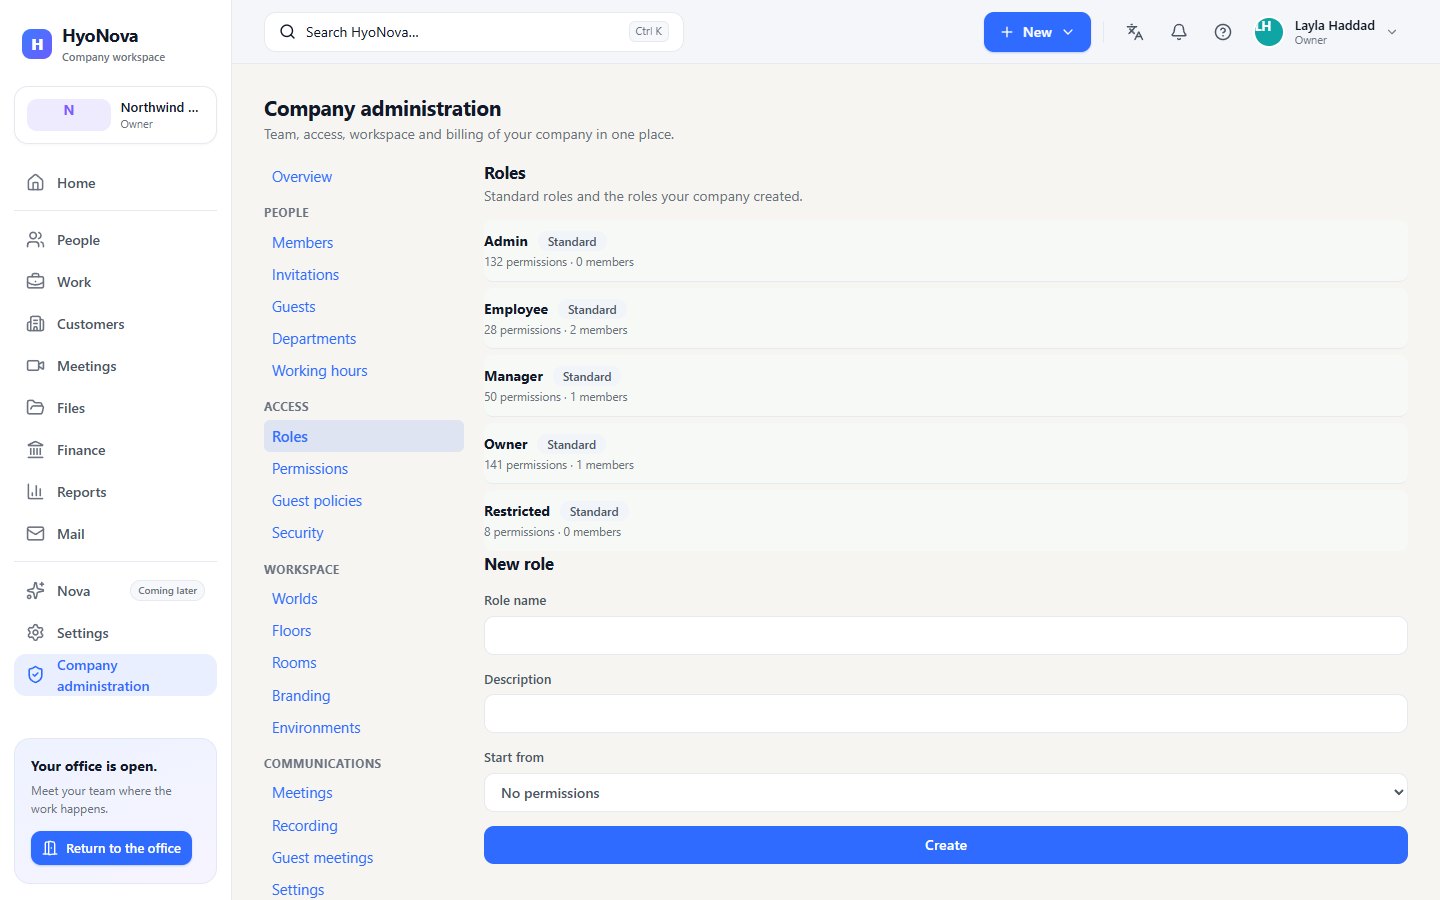
- Open Roles. Go to Company administration → Access → Roles.
- Name the role. Under New role, type
Team leadin Role name. Add a Description, for example "Employee who assigns tasks and runs meetings". The name must be unique in your company. - Start from Employee. In Start from, choose Employee. The new role starts with exactly the Employee permissions. (Choose No permissions to build a role from nothing.)
- Create it. Select Create. Team lead appears in the list, tagged Custom, with 0 members.
Step 4: Adjust its permissions#
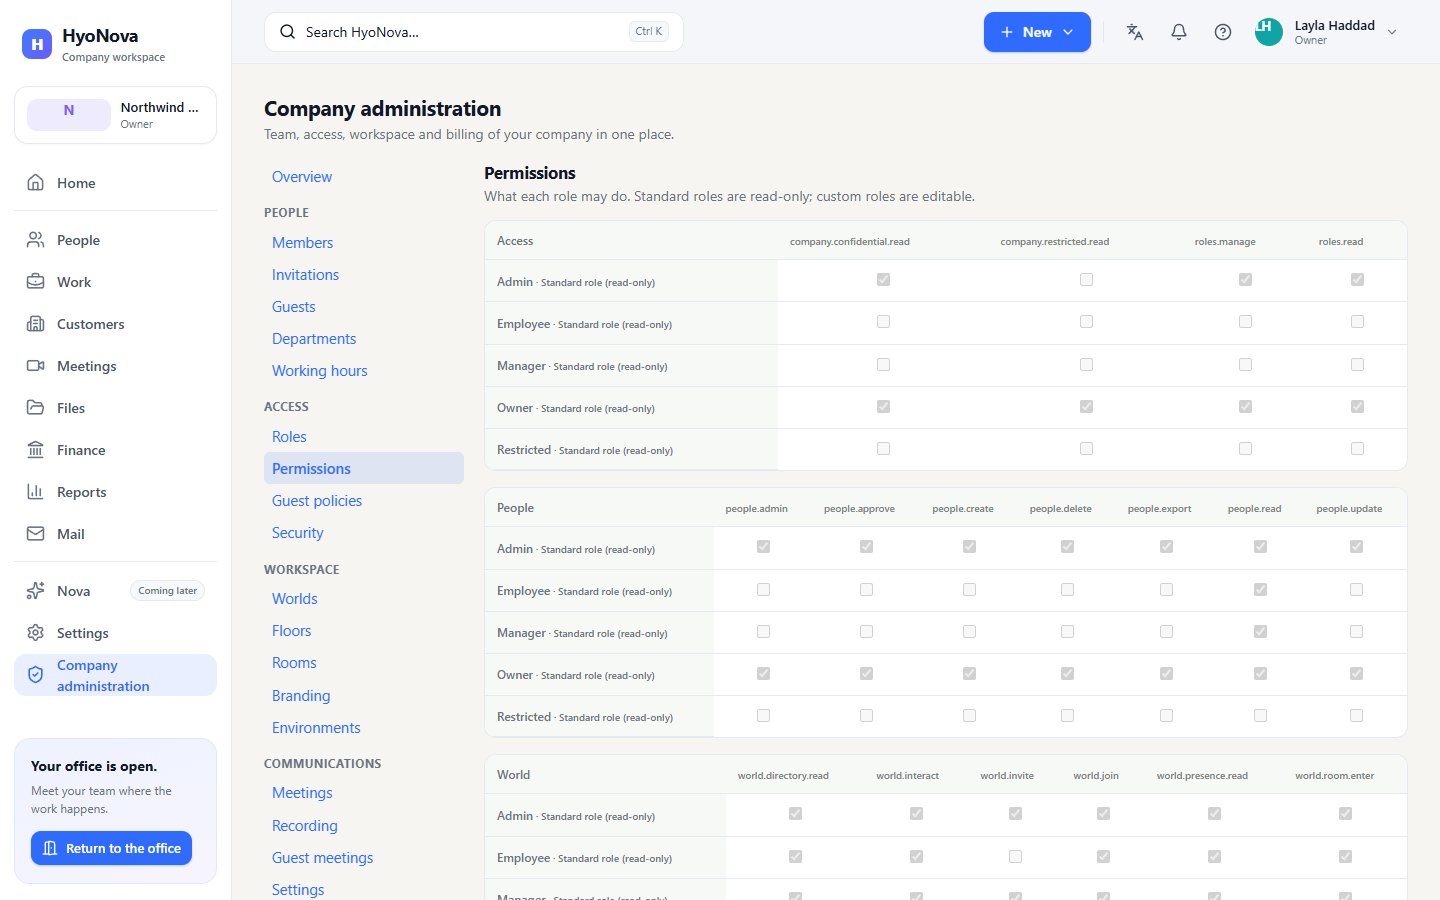
- Open Permissions. Go to Company administration → Access → Permissions. Each group has its own table; each row is a role. Standard roles are marked Standard role (read-only) and cannot be changed.
- Let Team lead assign tasks. In the Projects & tasks table, tick
tasks.approvein the Team lead row. - Let Team lead run meetings. In the Meetings table, tick
communications.meeting.moderatein the Team lead row. - Save. Select Save role: Team lead at the top of the page. Until you save, nothing is stored.
You can only tick permissions you hold yourself; the others stay greyed out. The same applies when you untick: a change is saved for everyone who holds the role, straight away.
Step 5: Give the role to a member#
Custom roles are assigned only in Company administration — not in the invitation form and not in the People page menu.
- Open Members. Go to Company administration → People → Members.
- Choose the role. On the member's row, open the Change role list and choose Team lead. The change is saved as soon as you choose it.
The list shows the standard and custom roles you may grant. It is shown for active members other than yourself; invited members get their role when they accept.
Step 6: Verify#
- On Members, the person's Role now reads Team lead.
- On Roles, Team lead shows 1 member.
- Ask the person to reload HyoNova. They can now assign tasks to colleagues in Work and use the host controls in meetings they host.
- In Company administration → Company → Audit log, type
role.in Filter by action to see the role being created and updated, ormember.to see the role change. See Audit.
On the People page, a member with a custom role currently appears with the Employee label. Use Members in Company administration to see the custom role's name.
Change or delete the role later#
- Rename it or change the description: on Roles, select Edit on its row, change the fields and select Save.
- Change what it may do: tick or untick in Permissions and select Save role. Everyone who holds the role is affected at once.
- Delete it: first move every member who holds it to another role in Members. Then select Delete on Roles. While anyone holds the role, Delete is unavailable and says "This role is assigned to members and cannot be deleted."
Remove a member#
When someone leaves the company, open Company administration → People → Members, select Remove from company on their row and confirm "Remove this member?". You can also use More actions → Remove from company on the People page, which removes the member straight away without asking again. The person is signed out immediately and their seat becomes free.
Least privilege: give each person only what they need#
- Keep owners few. One or two owners — enough that someone can always act, few enough that payroll and restricted records stay private.
- Use Admin for people who run the company, not for people who only need to invite colleagues occasionally.
- Make team leads Managers, or build a custom role when Manager gives too much — for example when a lead should not see customers.
- Use Employee as the default for everyone else.
- Use Restricted for contractors and temporary help who only need to see their tasks and files.
- Use guest links for visitors. Clients and candidates who only visit your office don't need a member role at all. See Manage guest access.
- Review roles when people change jobs, check the audit log from time to time, and remove members on their last day.
Show technical details
The permissions behind the most important differences:
| Permission | What it allows | Standard roles |
|---|---|---|
people.admin | Invite, change roles, remove members | Owner, Admin |
roles.manage | Create, edit and delete custom roles | Owner, Admin |
company.admin.read | Open Company administration | Owner, Admin, Manager |
audit.read | Read the audit log | Owner, Admin |
world.manage | Create office worlds and open the builder | Owner, Admin |
world.manage_access | Allow or stop guests; revoke any guest link | Owner, Admin |
world.invite | Create guest links | Owner, Admin, Manager |
tasks.approve | Assign tasks to other people | Owner, Admin, Manager |
communications.meeting.moderate | Host controls in meetings | Owner, Admin, Manager |
communications.read | Chat and the meeting list | Owner, Admin, Manager, Employee |
Permission checks run on the server for every request. Creating, updating and deleting roles are recorded as role.created, role.updated and role.deleted; role changes and removals as member.role_changed and member.removed.
Related#
- Roles and permissions — the complete permission comparison and custom role rules.
- People — the directory, departments and working hours.
- Audit — who changed what in your company.
Was this page helpful?
Thanks. Page ratings are not collected yet, so nothing was sent. If something is missing or wrong, see the Get help page.