Contacts and audience
Build your Hyo Mail audience — contacts, CSV import, custom attributes, lists, segments, the suppression list, sign-up forms and unsubscribes.
On this page
Your audience in Hyo Mail is made of contacts: the people your company may email, each with a status that records their consent. You group them with lists and segments, and HyoNova keeps a suppression list of addresses that must never receive marketing email.
Mail contacts are your email audience only. They are separate from your company's members and from the customer records in Customers.
Who can do what#
- Anyone with access to Mail can view contacts, lists, segments, forms and the suppression list.
- Adding, importing and editing contacts, lists, segments and forms needs permission to create and edit in Mail.
- Export CSV needs permission to export from Mail.
- Removing an address from the suppression list needs Mail administration.
By default, Owners and Admins have all of these. See Hyo Mail.
Contacts#
Open Mail › Contacts. The table lists every contact with Email, Name, Company, Status, Tags and Created. Use Search by email or name, filter by status, list or tag, and change the Sort.
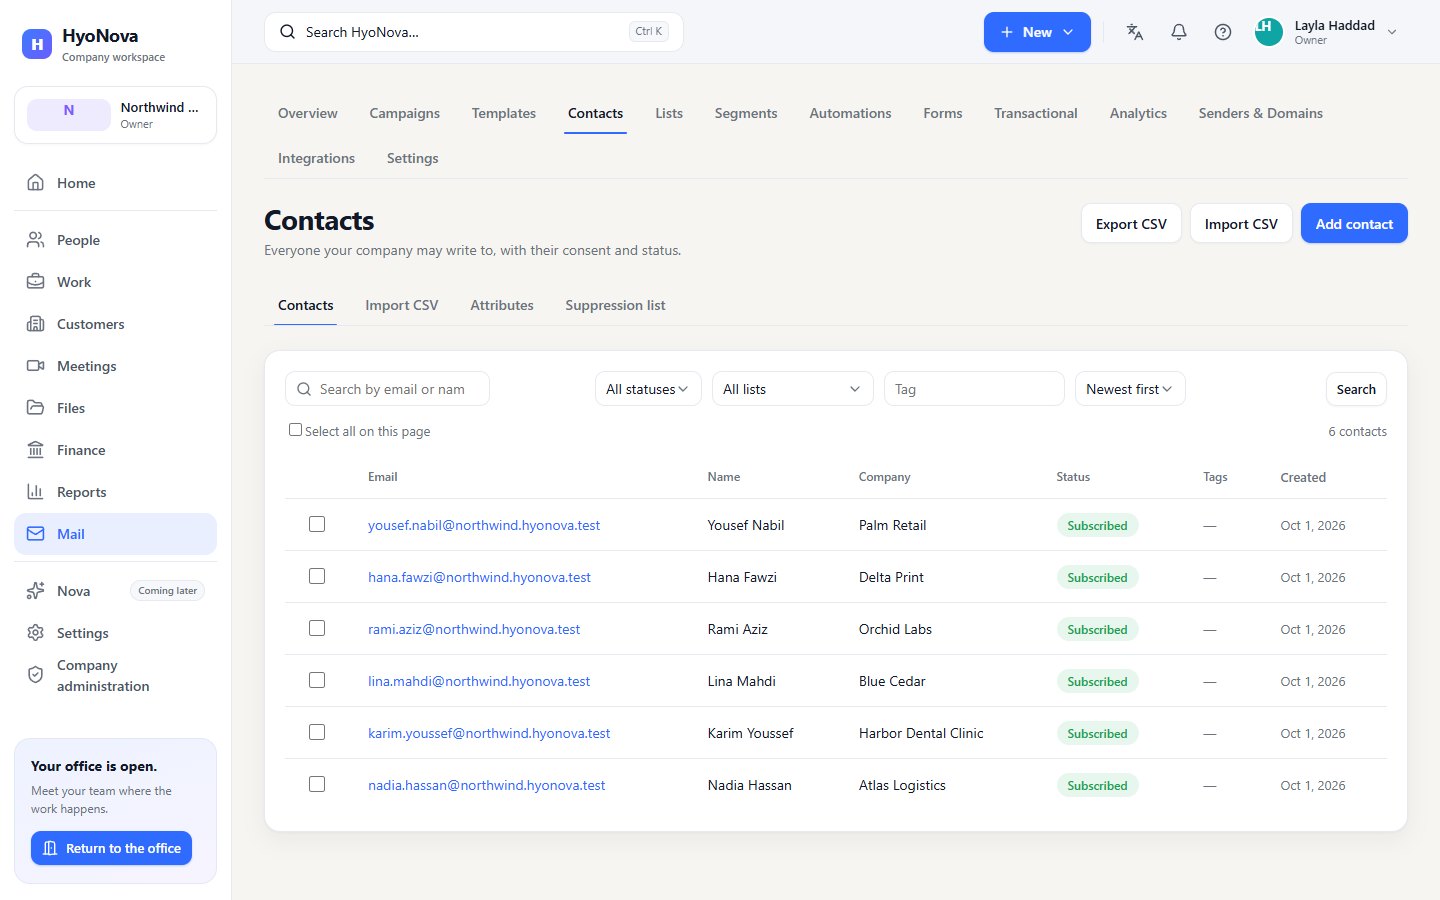
Each contact has one status:
| Status | Meaning |
|---|---|
| Subscribed | Receives campaigns and automations |
| Pending | Waiting to confirm a sign-up (double opt-in). Receives nothing until confirmed |
| Unsubscribed | Opted out of marketing email |
| Bounced | An email to this address bounced permanently |
| Complained | The person reported an email as spam |
| Suppressed | Blocked by the suppression list |
Only Subscribed contacts receive campaigns. Bounced and complained addresses are suppressed automatically.
Add a contact#
- Open the form. In Contacts, choose Add contact.
- Fill in the details. Email is required. First name, Last name, Company, Phone, Language, Time zone and Tags are optional. Choose the status: Subscribed or Pending.
- Record consent. In Consent source, say where the consent came from — for example "website form" or "event sign-up".
- Save. The contact appears in the table. Open it to see Profile, Consent, its lists and Activity.
Bulk actions#
Select contacts with the checkboxes (or Select all on this page), then choose a bulk action: Add to list, Remove from list, Add tag, Remove tag, Archive or Unsubscribe. Archived contacts stay in your history but no longer receive campaigns.
Export CSV downloads the contacts that match the current filters.
Import a CSV file#
- Open the import. In Contacts, open the Import CSV tab.
- Upload. Choose a UTF-8 CSV file. Files up to about 8 MB are accepted; split larger files.
- Map columns. For each column, choose what it becomes: Email, First name, Last name, Company, Phone, Language, Time zone, Tags, a custom attribute, or Skip. Exactly one column must be Email.
- Choose options. Optionally add the imported contacts to a list, decide what happens to Contacts that already exist (Update their details or Leave them unchanged), and fill in the Consent source.
- Start the import. The page updates while the import runs, then shows Rows, New, Updated, Duplicates, Invalid, Suppressed and Failed.
Addresses on the suppression list are not re-subscribed by an import.
Custom attributes#
The Attributes tab holds custom fields you keep about each contact — for example a membership level or a renewal date. Each attribute has a Key (lowercase letters, digits and underscores) and a Type: Text, Number, Yes / No or Date. You can use attributes in segments, in automations and as variables in emails. Deleting an attribute deletes its value on every contact.
Lists#
A list is a fixed group of contacts that you add people to — for example "Newsletter". Open Mail › Contacts › Lists, choose New list, give it a name and an optional Description, then open it and use Add members. Archiving a list does not remove its contacts from your audience.
Lists are used as campaign audiences, as the target of sign-up forms and as automation triggers.
Segments#
A segment is an audience defined by rules. It is evaluated when you send, so it always reflects your contacts at that moment.
- Create the segment. Open Mail › Contacts › Segments and choose New segment.
- Add rules. Each rule is a Field, a Condition and a Value. Fields include contact details, custom attributes, lists, tags and campaign activity — for example "is in list", "has tag", "opened campaign", "clicked in campaign" or "within the last (days)".
- Combine them. Under Match, choose all of the rules or any of the rules. Use Add group for a nested group with its own match.
- Preview. Choose Preview count to see how many contacts match and a few examples. A segment without rules includes every subscribed contact.
- Save. The segment shows its last count in the list.
The suppression list#
The Suppression list tab under Contacts lists addresses that never receive marketing email, with a Reason:
- Hard bounce and Complaint — added automatically. They cannot be removed, because they protect your sending reputation.
- Unsubscribed — the person opted out.
- Manual and Policy — added by your team with Add suppression.
Bounced and complaining addresses also stop receiving transactional email.
Unsubscribes and the preference centre#
Every marketing email carries an unsubscribe link, and Mail adds a one-click unsubscribe header that mailbox providers can show as their own unsubscribe button. In Mail › Settings › General, choose what the link does:
- Unsubscribe from everything — one click removes the contact from all marketing email.
- Open the preference centre — the contact chooses which lists to leave.
Unsubscribing never stops transactional email, such as receipts that your product sends.
Sign-up forms#
A sign-up form collects new subscribers with their consent and adds them to a list.
- Create the form. Open Mail › Contacts › Forms and choose New form.
- Choose the list. In Add subscribers to list, pick a list, or No list (contacts only).
- Set the fields. Email is always required. Add up to 20 fields in total; each field's Key maps to a contact field or a custom attribute.
- Write the consent text. Consent text is shown next to the submit button and saved as the consent record. Add a Success message.
- Decide on double opt-in. With Double opt-in on, HyoNova sends a confirmation email. Write its Confirmation subject and Confirmation body, and put
{{ confirm_url }}where the link should go. The contact stays Pending until they confirm; the link works for 72 hours. - Share it. Under Share, copy the Hosted page address or the Embed code for your website.
Submissions shows each submission with its status and when it was confirmed. Forms are protected against automated spam and rate limited. Archiving a form stops its hosted page from accepting submissions.
Limits#
No plan limits the number of contacts. Sending to them uses Mail credits — one per email to one recipient. Contacts can also come from a store; see Connect your store. See Mail and Sign capacity.
Status#
| Feature | Status | Notes |
|---|---|---|
| Contacts, lists and segments | AvailableWorks today for workspaces whose plan includes it. | Contacts with consent, CSV import, custom attributes, lists, rule-based segments and a suppression list. |
| Sign-up forms | AvailableWorks today for workspaces whose plan includes it. | Hosted or embedded forms with optional double opt-in and a preference centre. |
Was this page helpful?
Thanks. Page ratings are not collected yet, so nothing was sent. If something is missing or wrong, see the Get help page.